Shiply ReactNative 动态化 SDK 接入指引
一、隐私安全说明
Shiply ReactNative 动态化 SDK
- 版本:0.4.0
- 更新时间:2025年12月22日
- SDK介绍:为 ReactNative 开发框架提供动态化能力,方便开发者在线更新或修复问题
- 服务提供方:深圳市腾讯计算机系统有限公司
- 接入指引:Shiply ReactNative 动态化 SDK 接入指引
- 隐私保护规则:《Shiply 容器动态化 SDK 隐私保护规则》
二、SDK 接入
可以参考 ShiplyReactNativeUpgradeDemo 项目进行接入。
2.1 引入 Shiply RN 动态化扩展包
2.1.1 添加 RN 层依赖
在项目根目录执行:
npm install rn-shiply-upgrade
2.1.2 添加 Android 层依赖
在项目 Android 目录下的 build.gradle 文件中添加 maven 地址:
allprojects {
  repositories {
    maven { url "https://maven.cnb.cool/tencent-tds/shiply-public/-/packages/" }
  }
}
2.1.3 添加 iOS 层依赖
暂时不需要额外设置。
2.1.4 添加 HarmonyOS 层依赖
步骤 1:配置模块路径
在 HarmonyOS 工程根目录 的 build-profile.json5 中添加模块配置:
{
  "modules": [
    // ... 其他模块
    {
      "name": "ohrn_shiply_upgrade",
      "srcPath": "../node_modules/rn-shiply-upgrade/harmony/shiply_react_native_upgrade"
    },
    {
      "name": "entry",
      "srcPath": "./entry"
    }
  ]
}
srcPath 需要根据你的项目目录结构调整,确保路径指向 rn-shiply-upgrade/harmony/shiply_react_native_upgrade 目录。
步骤 2:配置 entry 依赖
在 entry/oh-package.json5 中添加依赖:
{
  "dependencies": {
    "@rnoh/react-native-openharmony": "^0.72.96",
    "ohrn_shiply_upgrade": "file:../../node_modules/rn-shiply-upgrade/harmony/shiply_react_native_upgrade"
  }
}
步骤 3:配置 MMKV 版本
由于 Shiply SDK 依赖 @tencent/mmkv,为避免版本冲突,需要在 HarmonyOS 工程根目录 的 oh-package.json5 中添加版本覆盖:
{
  "overrides": {
    "@tencent/mmkv": "2.2.4"
  }
}
此步骤非常重要,版本不一致可能导致运行时错误。
步骤 4:配置 C++ 构建
在 entry/src/main/cpp/CMakeLists.txt 中添加:
# ... 其他配置

# 添加 shiply upgrade 模块
add_subdirectory("${OH_MODULE_DIR}/ohrn_shiply_upgrade/src/main/cpp" ./shiply_upgrade)
target_link_libraries(rnoh_app PUBLIC rnoh_shiply_upgrade)

target_link_libraries(rnoh_app PUBLIC rnoh)
步骤 5:注册 C++ Package
在 entry/src/main/cpp/PackageProvider.cpp 中添加:
#include "RNOH/PackageProvider.h"
#include "ShiplyReactNativeUpgradePackage.h"

using namespace rnoh;

std::vector<std::shared_ptr<Package>> PackageProvider::getPackages(Package::Context ctx) {
    return {
        // ... 其他 Package
        std::make_shared<ShiplyReactNativeUpgradePackage>(ctx)
    };
}
步骤 6:注册 TypeScript Package
在 entry/src/main/ets/RNPackagesFactory.ets 中添加:
import { RNPackageContext, RNPackage } from '@rnoh/react-native-openharmony/ts';
import { ShiplyReactNativeUpgradePackage } from "ohrn_shiply_upgrade";

export function createRNPackages(ctx: RNPackageContext): RNPackage[] {
  return [
    // ... 其他 Package
    new ShiplyReactNativeUpgradePackage(ctx)
  ];
}
2.2 添加热更新检查与加载代码
2.2.1 修改 RN 层代码
import { Text, View, Image, Platform } from 'react-native';
import DeviceInfo from 'react-native-device-info';
import { HotUpdateHelper, HotUpdateButton } from 'rn-shiply-upgrade'; // 新增导入辅助类

const AppV2 = () => {
    // 初始化热更新配置(只需一次)
    HotUpdateHelper.getInstance({
        // 需要修改为业务方自己的 android/ios appId 和 appKey
        appId: Platform.OS === 'ios' ? 'xxx1' : 'xxx2',
        appKey: Platform.OS === 'ios'
            ? 'xxxxx1'
            : 'xxxxx2',
        deviceId: '33333', // 需要修改为实际的设备 id
        appVersion: DeviceInfo.getVersion(), // 应用版本号
        isDebugPackage: false,
        customParamsByJson: JSON.stringify({ age: '22', name: 'testName' }), // 自定义请求参数,按需设置
        env: 'online', // 环境类型
        shiplyResName: 'testRN', // 资源 key 名称,对应 Shiply 平台上创建的资源 key
        eventLogger: ({ type, data }) => {
            console.log(`[HotUpdate] ${type}:`, data);
        }
    });

    return (
        <View style={{ flex: 1, justifyContent: 'center', alignItems: 'center' }}>
            {/* 默认样式按钮 */}
            <HotUpdateButton />
        </View>
    );
};

export default AppV2;
- 点击按钮即可触发更新检测请求
- 也可以参考
HotUpdateButton中相关代码自定义请求时机和 UI 表现
2.2.2 修改 Android 层代码
class MainApplication : Application(), ReactApplication {

  override val reactNativeHost: ReactNativeHost =
      object : DefaultReactNativeHost(this) {
        override fun getPackages(): List<ReactPackage> =
            PackageList(this).packages.apply {
            }

        override fun getJSMainModuleName(): String = "index"

        override fun getUseDeveloperSupport(): Boolean = BuildConfig.DEBUG

        override fun getJSBundleFile(): String? {
          var result: String? = null
          // 从 Shiply 获取 RN bundle 路径,业务方需要将资源 key 修改为 Shiply 平台中创建的资源 key 名称
          result = ShiplyReactNativeUpgradeModule.getJSBundleFilePath(applicationContext as Application, "testRN")
          Log.d(TAG, "getJSBundleFile: $result")
          return result
        }

        override val isNewArchEnabled: Boolean = BuildConfig.IS_NEW_ARCHITECTURE_ENABLED
        override val isHermesEnabled: Boolean = BuildConfig.IS_HERMES_ENABLED
      }
}
复写 getJSBundleFile 方法,从 Shiply 获取 bundle 路径,业务方需要将资源 key 修改为 Shiply 平台中创建的资源 key 名称。
Shiply ReactNative 动态化 SDK native 层日志打印是对接的 RN 框架的日志接口,可以参考以下代码将 RN 日志对接到业务方自己的日志系统。
Android 日志配置示例代码:
FLog.setLoggingDelegate(object : LoggingDelegate {
  private var logLevel = FLog.INFO  // 默认日志级别
  private val prefix = "TestFlog_"
  override fun setMinimumLoggingLevel(level: Int) {
    logLevel = level
  }

  override fun getMinimumLoggingLevel(): Int = logLevel

  override fun isLoggable(level: Int): Boolean = level >= logLevel


  override fun v(tag: String, msg: String) {
    log(FLog.VERBOSE, tag, msg)
  }

  override fun v(tag: String, msg: String, tr: Throwable) {
    log(FLog.VERBOSE, tag, "$msg\n${Log.getStackTraceString(tr)}")
  }

  override fun d(tag: String, msg: String) {
    log(FLog.DEBUG, tag, msg)
  }

  override fun d(tag: String, msg: String, tr: Throwable) {
    log(FLog.DEBUG, tag, "$msg\n${Log.getStackTraceString(tr)}")
  }

  override fun i(tag: String, msg: String) {
    log(FLog.INFO, tag, msg)
  }

  override fun i(tag: String, msg: String, tr: Throwable) {
    log(FLog.INFO, tag, "$msg\n${Log.getStackTraceString(tr)}")
  }

  override fun w(tag: String, msg: String) {
    log(FLog.WARN, tag, msg)
  }

  override fun w(tag: String, msg: String, tr: Throwable) {
    log(FLog.WARN, tag, "$msg\n${Log.getStackTraceString(tr)}")
  }

  override fun e(tag: String, msg: String) {
    log(FLog.ERROR, tag, msg)
  }

  override fun e(tag: String, msg: String, tr: Throwable) {
    log(FLog.ERROR, tag, "$msg\n${Log.getStackTraceString(tr)}")
  }

  override fun wtf(tag: String, msg: String) {
    Log.wtf(tag, msg)
  }

  override fun wtf(tag: String, msg: String, tr: Throwable) {
    Log.wtf(tag, msg, tr)
  }

  override fun log(priority: Int, tag: String, msg: String) {
    val newTag = prefix + tag
    when (priority) {
      FLog.VERBOSE -> Log.v(newTag, msg)
      FLog.DEBUG -> Log.d(newTag, msg)
      FLog.INFO -> Log.i(newTag, msg)
      FLog.WARN -> Log.w(newTag, msg)
      FLog.ERROR -> Log.e(newTag, msg)
      else -> Log.println(priority, newTag, msg)
    }
  }
})
2.2.3 修改 iOS 层代码
import UIKit
import React
import React_RCTAppDelegate
import ReactAppDependencyProvider
import ShiplyReactNativeUpgrade

@main
class AppDelegate: RCTAppDelegate {
  override func application(_ application: UIApplication, didFinishLaunchingWithOptions launchOptions: [UIApplication.LaunchOptionsKey : Any]? = nil) -> Bool {
    self.moduleName = "ShiplyReactNativeUpgradeExample"
    self.dependencyProvider = RCTAppDependencyProvider()
    self.initialProps = [:]
    return super.application(application, didFinishLaunchingWithOptions: launchOptions)
  }

  override func sourceURL(for bridge: RCTBridge) -> URL? {
    self.bundleURL()
  }

  override func bundleURL() -> URL? {
#if DEBUG
    let buildConfig = "Debug"
#else
    let buildConfig = "Release"
#endif

    NSLog("bundleURL called - Build Configuration: \(buildConfig)")

    // 业务方需要将资源 key 修改为 Shiply 平台中创建的资源 key 名称
    ShiplyReactNativeUpgradeUtil.getJSBundleFilePath("testRN");
    if let path = ShiplyReactNativeUpgradeUtil.getJSBundleFilePath("testRN") {
        NSLog("bundleURL called,path = %@ ", path);

        return URL(fileURLWithPath: path)
    }
    return Bundle.main.url(forResource: "main", withExtension: "jsbundle")
  }
}
复写 bundleURL 方法,从 Shiply 获取 bundle 路径,业务方需要将资源 key 修改为 Shiply 平台中创建的资源 key 名称。
Shiply ReactNative 动态化 SDK native 层日志打印是对接的 RN 框架的日志接口,可以参考以下代码将 RN 日志对接到业务方自己的日志系统。
iOS 日志配置示例代码:
RCTSetLogThreshold(RCTLogLevelInfo);
RCTLogFunction customLogFunction = ^(RCTLogLevel level,
                                     RCTLogSource source,
                                     NSString *fileName,
                                     NSNumber *lineNumber,
                                     NSString *message)
{
    NSString *levelStr;
    switch (level) {
        case RCTLogLevelError: levelStr = @"🔴 ERROR"; break;
        case RCTLogLevelWarning: levelStr = @"⚠️ WARN"; break;
        default: levelStr = @"INFO"; break;
    }

    NSString *sourceStr = (source == RCTLogSourceNative) ? @"[Native]" : @"[JS]";

    NSLog(@"TestAPP_%@ %@ %@:%@ %@",
          levelStr,
          sourceStr,
          fileName,
          lineNumber,
          message);
};
// 设置自定义日志函数
RCTSetLogFunction(customLogFunction);
2.2.4 修改 HarmonyOS 层代码
在 entry/src/main/ets/pages/Index.ets 中配置热更新 Bundle 加载器:
import {
  AnyJSBundleProvider,
  MetroJSBundleProvider,
  ResourceJSBundleProvider,
  RNApp,
  TraceJSBundleProviderDecorator,
  RNOHCoreContext
} from '@rnoh/react-native-openharmony';
import { createRNPackages } from '../RNPackagesFactory';
import { ShiplyFileJSBundleProvider } from 'ohrn_shiply_upgrade';

@Entry
@Component
struct Index {
  @StorageLink('RNOHCoreContext') private rnohCoreContext: RNOHCoreContext | undefined = undefined

  // ... 其他代码

  build() {
    Column() {
      if (this.rnohCoreContext) {
        RNApp({
          rnInstanceConfig: {
            createRNPackages,
            enableNDKTextMeasuring: true,
            enableBackgroundExecutor: false,
            enableCAPIArchitecture: true,
            arkTsComponentNames: []
          },
          initialProps: {} as Record<string, string>,
          appKey: "YourAppName",  // 替换为你的 RN 应用名称
          jsBundleProvider: new TraceJSBundleProviderDecorator(
            new AnyJSBundleProvider([
              // 热更新 Bundle Provider(放在最前面,优先加载)
              // 'resId' 参数是你在 Shiply 平台配置的资源 ID
              new ShiplyFileJSBundleProvider(this.rnohCoreContext.uiAbilityContext, 'your_res_id'),

              // 开发调试用 Metro Provider
              new MetroJSBundleProvider(),

              // 内置 Bundle(兜底)
              new ResourceJSBundleProvider(this.rnohCoreContext.uiAbilityContext.resourceManager, 'bundle.harmony.js')
            ]),
            this.rnohCoreContext.logger
          ),
        })
      }
    }
    .height('100%')
    .width('100%')
  }
}
ShiplyFileJSBundleProvider必须放在 Provider 列表的 最前面,这样会优先尝试加载热更新包- 第二个参数
resId是你在 Shiply 平台配置的资源 ID,用于区分不同的热更新资源
三、打包 RN 动态化产物
3.1 打包 Android 产物
在工程的根目录执行以下命令进行打包:
react-native bundle \
  --entry-file ./index.js \
  --bundle-output ./bundle/androidBundle/index.android.bundle \
  --platform android \
  --assets-dest ./bundle/androidBundle \
  --dev false
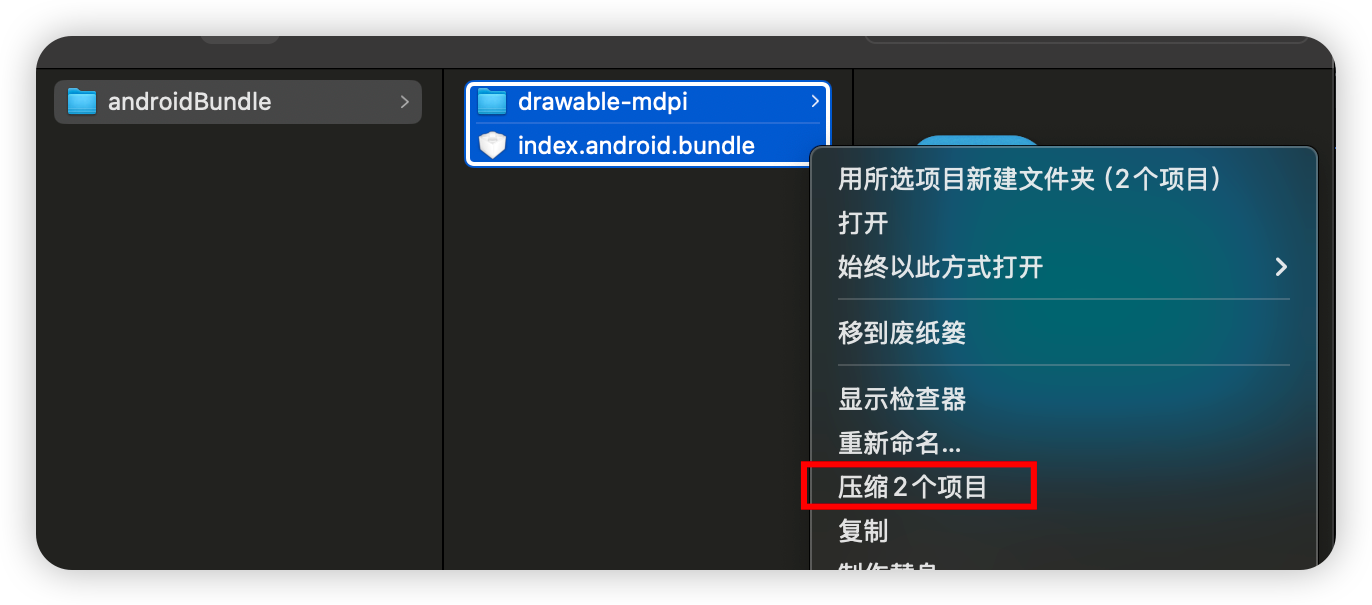
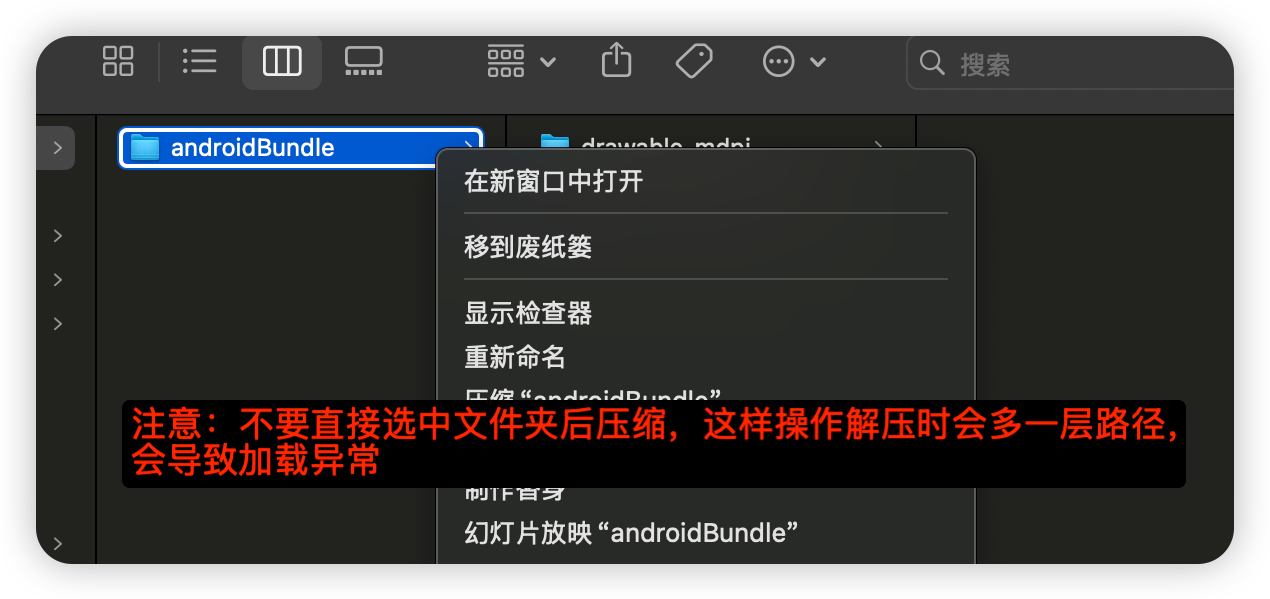
执行后,工程根目录 /bundle/androidBundle 下会生成 Android 产物,全选 androidBundle 下所有文件后进行压缩,得到的 zip 文件将用于上传到 Shiply。
3.2 打包 iOS 产物
在工程的根目录执行以下命令进行打包:
react-native bundle \
  --entry-file ./index.js \
  --bundle-output ./bundle/iOSBundle/index.ios.bundle \
  --platform ios \
  --assets-dest ./bundle/iOSBundle \
  --dev false
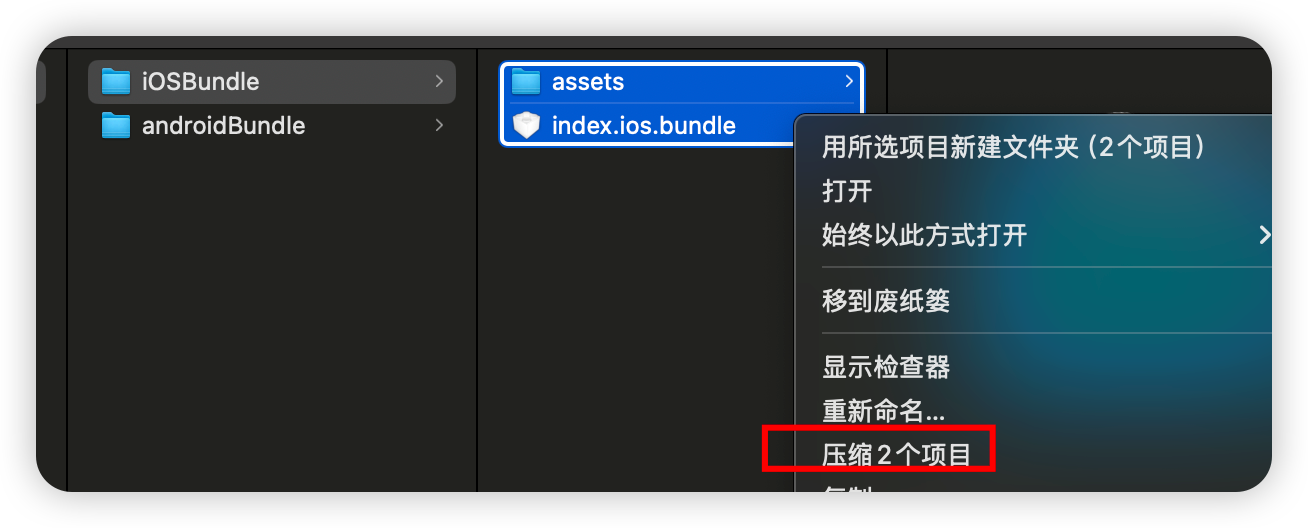
执行后,工程根目录 /bundle/iOSBundle 下会生成 iOS 产物,全选 iOSBundle 下所有文件后进行压缩,得到的 zip 文件将用于上传到 Shiply。
3.3 打包 HarmonyOS 产物
在工程的根目录执行以下命令进行打包:
react-native bundle-harmony \
  --entry-file ./index.js \
  --bundle-output ./bundle/harmonyBundle/bundle.harmony.js \
  --assets-dest ./bundle/harmonyBundle/assets \
  --dev false
执行后,工程根目录 /bundle/harmonyBundle 下会生成 HarmonyOS 产物,全选 harmonyBundle 下所有文件后进行压缩,得到的 zip 文件将用于上传到 Shiply。

四、发布 RN 动态化产物
获取到动态产物 zip 包后,即可将该 zip 包配置到发布平台进行发布,并由 SDK 自动下载安装,并在合适的时机加载生效。
发布平台的使用可参考 《平台使用指引》。